Add & Redirect Your Custom Domain in Blogger Blog
If you are a blogger and using a blogging platform from Google i.e. Blogger.com to blog, then hopefully you must be using a custom domain, if you are a professional or serious blogger. But for a new blogger setup of custom domain is a little bit tougher and many questions arise in the mind while adding a custom domain to blogger blog. The benefit of using a custom domain in blogger blog’s is many but the most interesting one is that, it removes the blogspot extension from your blog domain name. Today in this article we will help you in the setup process of your Blogger blog custom domain name and redirecting it properly to new custom domain.
There are widely two steps which we are going to perform in this article, which are listed below.
1. Adding Custom domain to blogger blog.
2. Properly redirecting the custom domain.
1. Adding Custom Domain to Blogger Blog
1. To add a custom domain in blogger first you will have to buy a domain name for your blog. You can buy cheap domain name for your blog from Namecheap or Crazy domains. You can also buy domain name even within your blogger domain but there domain name price is fixed.
2. Now in your domain registrar’s account, you need to add CNAME and A records in Domain Name System setting. Below are the two CNAME which you need to add.
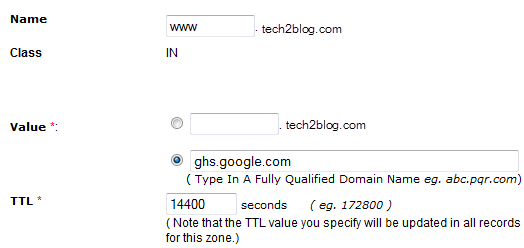
I. Name, Label, or Host field :www
Destination, Target, or Points To field : ghs.google.com
II. Second CNAME is domain specific and can be obtained by entering the domain which you bought at your blogger setting as shown in below. It will show error and will give you the 2nd CNAME.
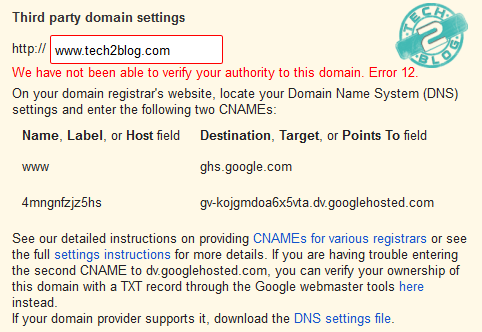
In my case adding only 1st CNAME worked. Below is the example of how you have to add CNAME for your custom domain.
Now also add A records to your DNS. In name field just enter your domain name like tech2blog.com (without www) and in destination IP, put the below IP (One IP address per A record).
216.239.32.21

216.239.34.21

216.239.36.21

216.239.38.21
Now you will have to create 4 A records with similar name but different IP as given above. A typical such A record is shown below.
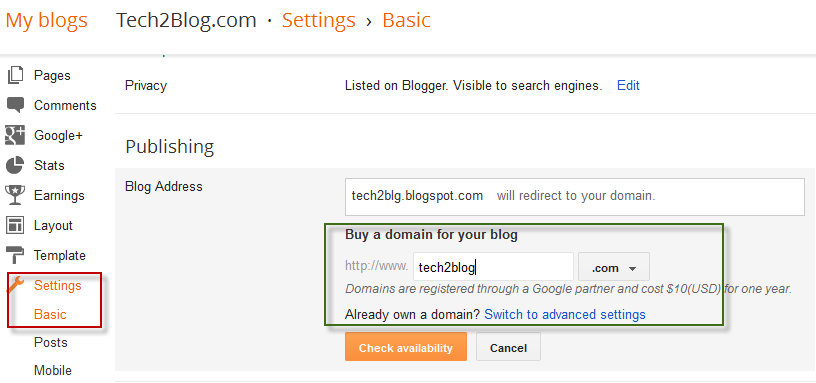
3. Now after buying domain and adding CNAME and A records, just login to your blogger dashboard and go to basic settings as shown below.
Now in publishing click on switch to advance settings.
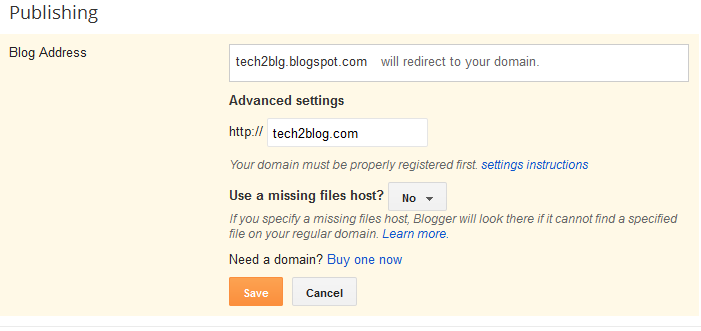
4. Now under advance setting you will see space for your new domain name, here just put your custom domain name and click save.
Now you are all done and your blogger blog will now redirect to your custom domain. To test, just put your domain name in any browser and test it.
Recommended Post: Blogger Enhanced Image Upload Feature
2. Proper Redirection of Custom Domain
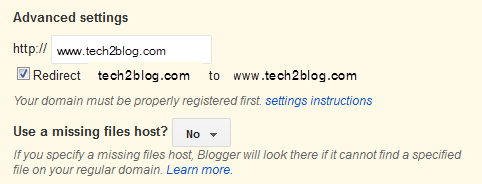
After successful addition of custom domain to your blogger blog, you will see that if you enter domain name without WWW you will get 404 error from Google. The reason for this error is that you have not redirected your domain properly. To do so, you just have to check redirect option in advance setting as shown below.
Hope from this tutorial you have learned how to setup custom domain in blogger blog and redirect it properly. If you have any concern or question regarding custom domain addition in blogger, then let us know through your email or comments, we will be happy to help you. If you like our tutorial, then please consider sharing it with others.



Hi Pawan,
Great tutorial,Will be very useful for all new bloggers !! 🙂
~Srikanth
Thanks Srikanth, I am sure post will be helpful for all new bloggers and blogger who want to migrate to custom domain.