How To Install Windows 11 on Mac without Manually Downloading ISO
If you would like to use software of the Microsoft Windows operating system on Mac, you will have to install the Windows operating system on Mac.
In this article, we will see how to install Windows 11 operating system on Mac without manually downloading it.

Table of Contents
Installing Windows 11 on a Mac using Parallels Desktop is a straightforward process that allows you to run both operating systems on the same machine. This can be useful for Mac users who need to use Windows-specific software or who want to try out the Windows operating system.
Prerequisites for Installing Windows 11 on Mac
1. Mac Machine/laptop (Intel, M1 or M2)
2. Parallels Desktop for Mac (We recommend using Parallels Desktop 18)
3. Internet connection
Note: This is a very simple installation and should take only 20-30 mins.
Step-by-Step Processes to Install Windows 11 on Mac
Here’s how to install Windows 11 on your Mac using Parallels Desktop:
1. First, you’ll need to purchase a copy of Parallels Desktop and a license for Windows 11. If you already have a copy of Windows 11, you can use that.
If you don’t have Windows 11 license, no need to worry, you can still use Windows 11.
2. Next, launch Parallels Desktop and click on the “File” menu. From the dropdown menu, select “New.”
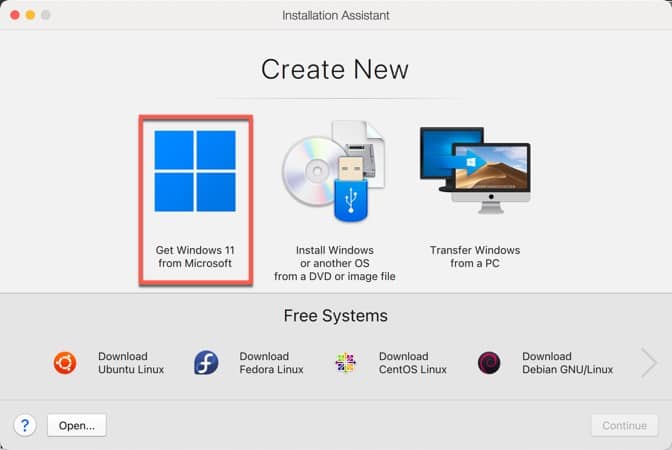
3. In the “Create New Virtual Machine” window, select “Install Windows or another OS from a DVD or image file” if you already have Windows 11 downloaded on your Mac, but for our tutorial, we just going to select “Get Windows 11 from Microsoft” and click “Continue.”

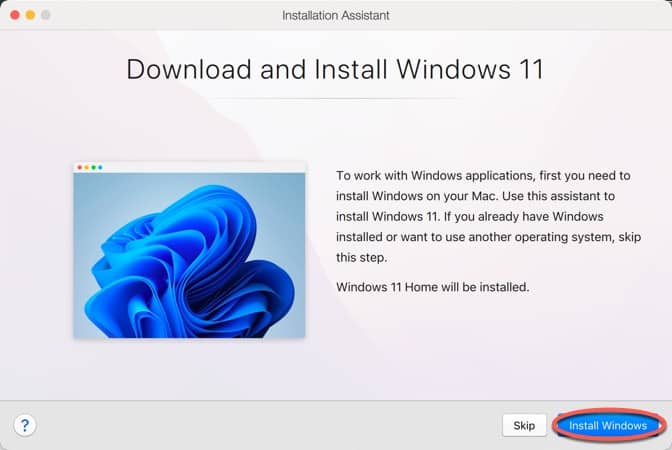
4. On the next screen, you will see the “Download and Install Windows 11” screen, here just click on install windows.

This will automatically download Windows 11 Home ISO to your Mac and will install it.
5. Windows 11 download and install will take around 20-30 minutes, depending upon your internet connection.
Once it is downloaded, you will see the installation complete message and then just accept “Windows License Agreement” and you are good to go.
Once you accept the agreement, Parallels Desktop for Mac will show you the internet browser with a successful message.
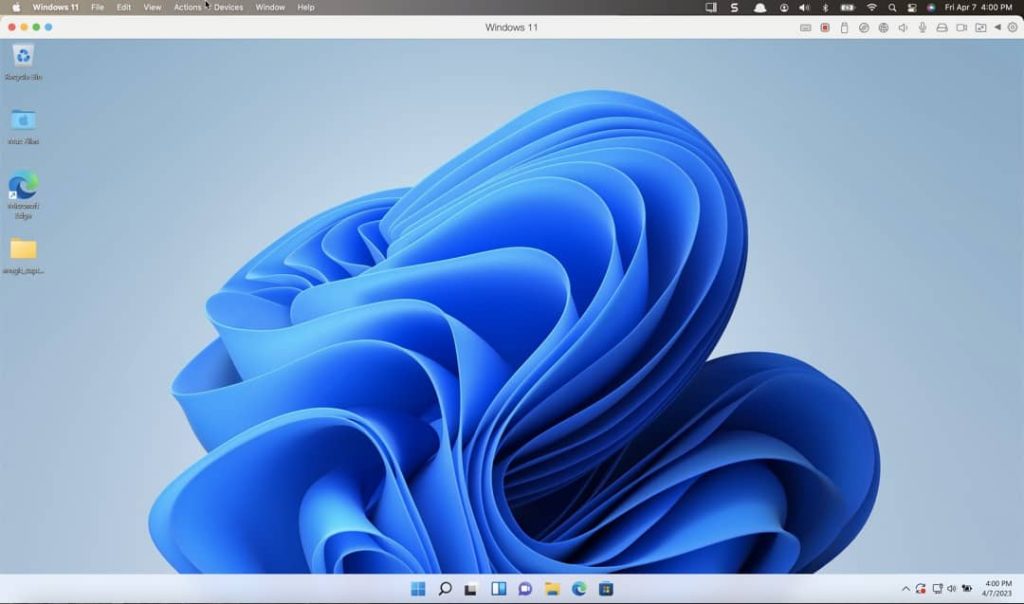
This is how easy to install Windows 11 on Mac without even downloading Windows 11 manually.
Disk Requirements for Windows 11 on Mac
If you are thinking how much disk space Windows 11 requires on Mac, then below is the output of the ‘df’ command that tells about the total space in your Mac or you can use other apps for Mac to check the disk space.
As you can see below it took only 19G if space to install Windows 11 on Mac.
$ df -h /
Filesystem Size Used Avail Capacity iused ifree %iused Mounted on
/dev/disk1s5s1 466Gi 14Gi 433Gi 4% 502047 4293651743 0% /
➜ ~

$ df -h /
Filesystem Size Used Avail Capacity iused ifree %iused Mounted on
/dev/disk1s5s1 466Gi 14Gi 418Gi 4% 502047 4293651743 0% /
➜ ~
This installation process is same for installing Windows 11 on M1 & M2 Mac machines.
Conclusion
Installing Windows 11 on Mac using Parallels Desktop for Mac is a simple process and can be done in just under 30 mins. If you like the article, share it with your friends and do subscribe to our free newsletter for more such Windows 11 tutorials.
FAQs
Q: Can I install Windows 11 on my Mac computer?
A: Yes, you can install Windows 11 on Mac with the help of Virtualization software like Parallels Desktop, VirtualBox, etc.
Q: Are there any hardware requirements for installing Windows 11 on a Mac?
A: Yes, Windows 11 has specific hardware requirements, including a compatible processor, sufficient RAM, and TPM 2.0 support, which may not be available on all Mac models. It’s important to check the official Windows 11 requirements and verify if your Mac meets them before attempting installation.
Q: What are the potential issues when installing Windows 11 on a Mac?
A: Installing Windows 11 on a Mac using virtualization software or Boot Camp may encounter potential issues such as driver compatibility, hardware limitations, or software conflicts. Some features of Windows 11 may also not be fully supported or optimized on Mac hardware.
Q: Can I switch between macOS and Windows 11 on my Mac after installation?
A: If you have installed Windows 11 on your Mac using virtualization software, you can switch between macOS and Windows 11 by running them simultaneously in separate virtual machines. However, if you have installed Windows 11 using Boot Camp, you need to restart your Mac and choose the desired operating system during the boot process.
Q: Do I need a Windows 11 license to install it on my Mac?
A: No, you don’t need a valid Windows 11 home license to install and use it during the trial period. Once the trial ends, you will need the license.
Q: Can I remove Windows 11 from my Mac if I no longer need it?
A: Yes, you can remove Windows 11 from your Mac by deleting the virtual machine or the Boot Camp partition. However, it’s important to note that this process may also delete any data or applications stored on the Windows partition or virtual machine, so it’s crucial to backup any important data before proceeding.


